Custom Data
Custom fields allow you to append additional data to the appointment being booked. You can either create fields that are shown to the user or fields that are hidden. All fields have the capability of being prepopulated upon app initialization. This allows you to add supplemental data to an appointment booking or to set field values with information you already have at the time of initialization. This allows you to do things like setting the client's email or other already-known preferences without having to ask them to fill out the information again. Hidden fields are ideal for setting hidden data that ties the client into your wider ecosystem, including CRM IDs, support IDs, or tracking IDs.
Adding Custom Fields
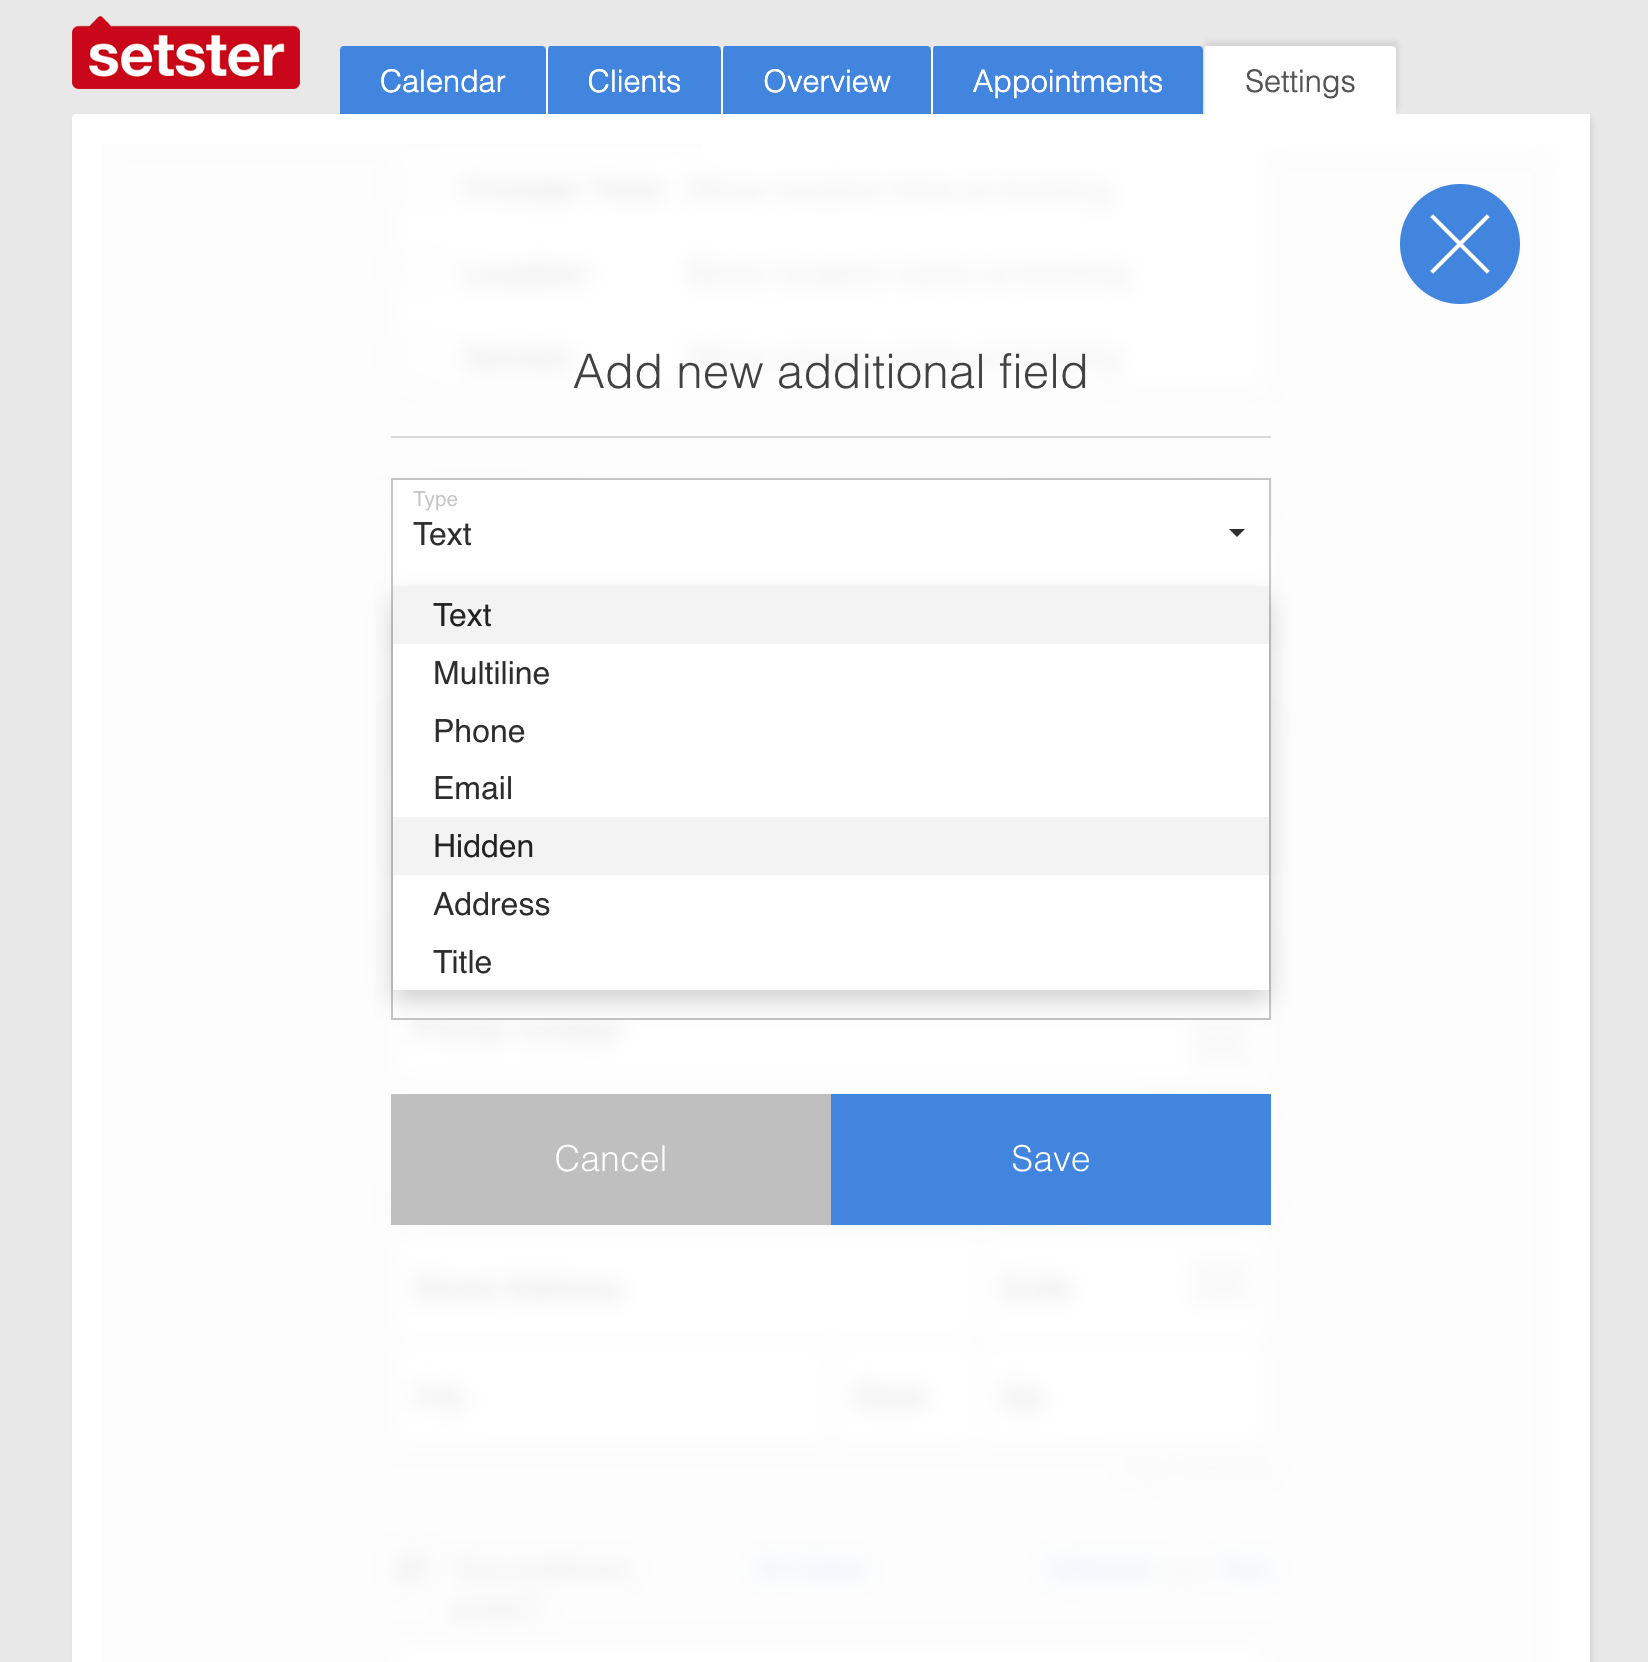
Custom fields can be one of the following types: Text | Multiline | Phone | Email | Hidden | Address | Title | Dropdown
Dropdown Fields
Dropdown fields (type 7) allow you to create a selection field with predefined options. They support both single-select and multi-select modes.
Configuration:
- Options: Define the available choices as a pipe-delimited string (e.g.,
Option A|Option B|Option C) - Multiselect: Set to
0for single selection or1to allow multiple selections
Example dropdown field data:
// Single select dropdown
const myCustomData = {
  preferred_contact_method: "Phone"
};

// Multi-select dropdown
const myCustomData = {
  interests: ["Sports", "Music", "Travel"]
};
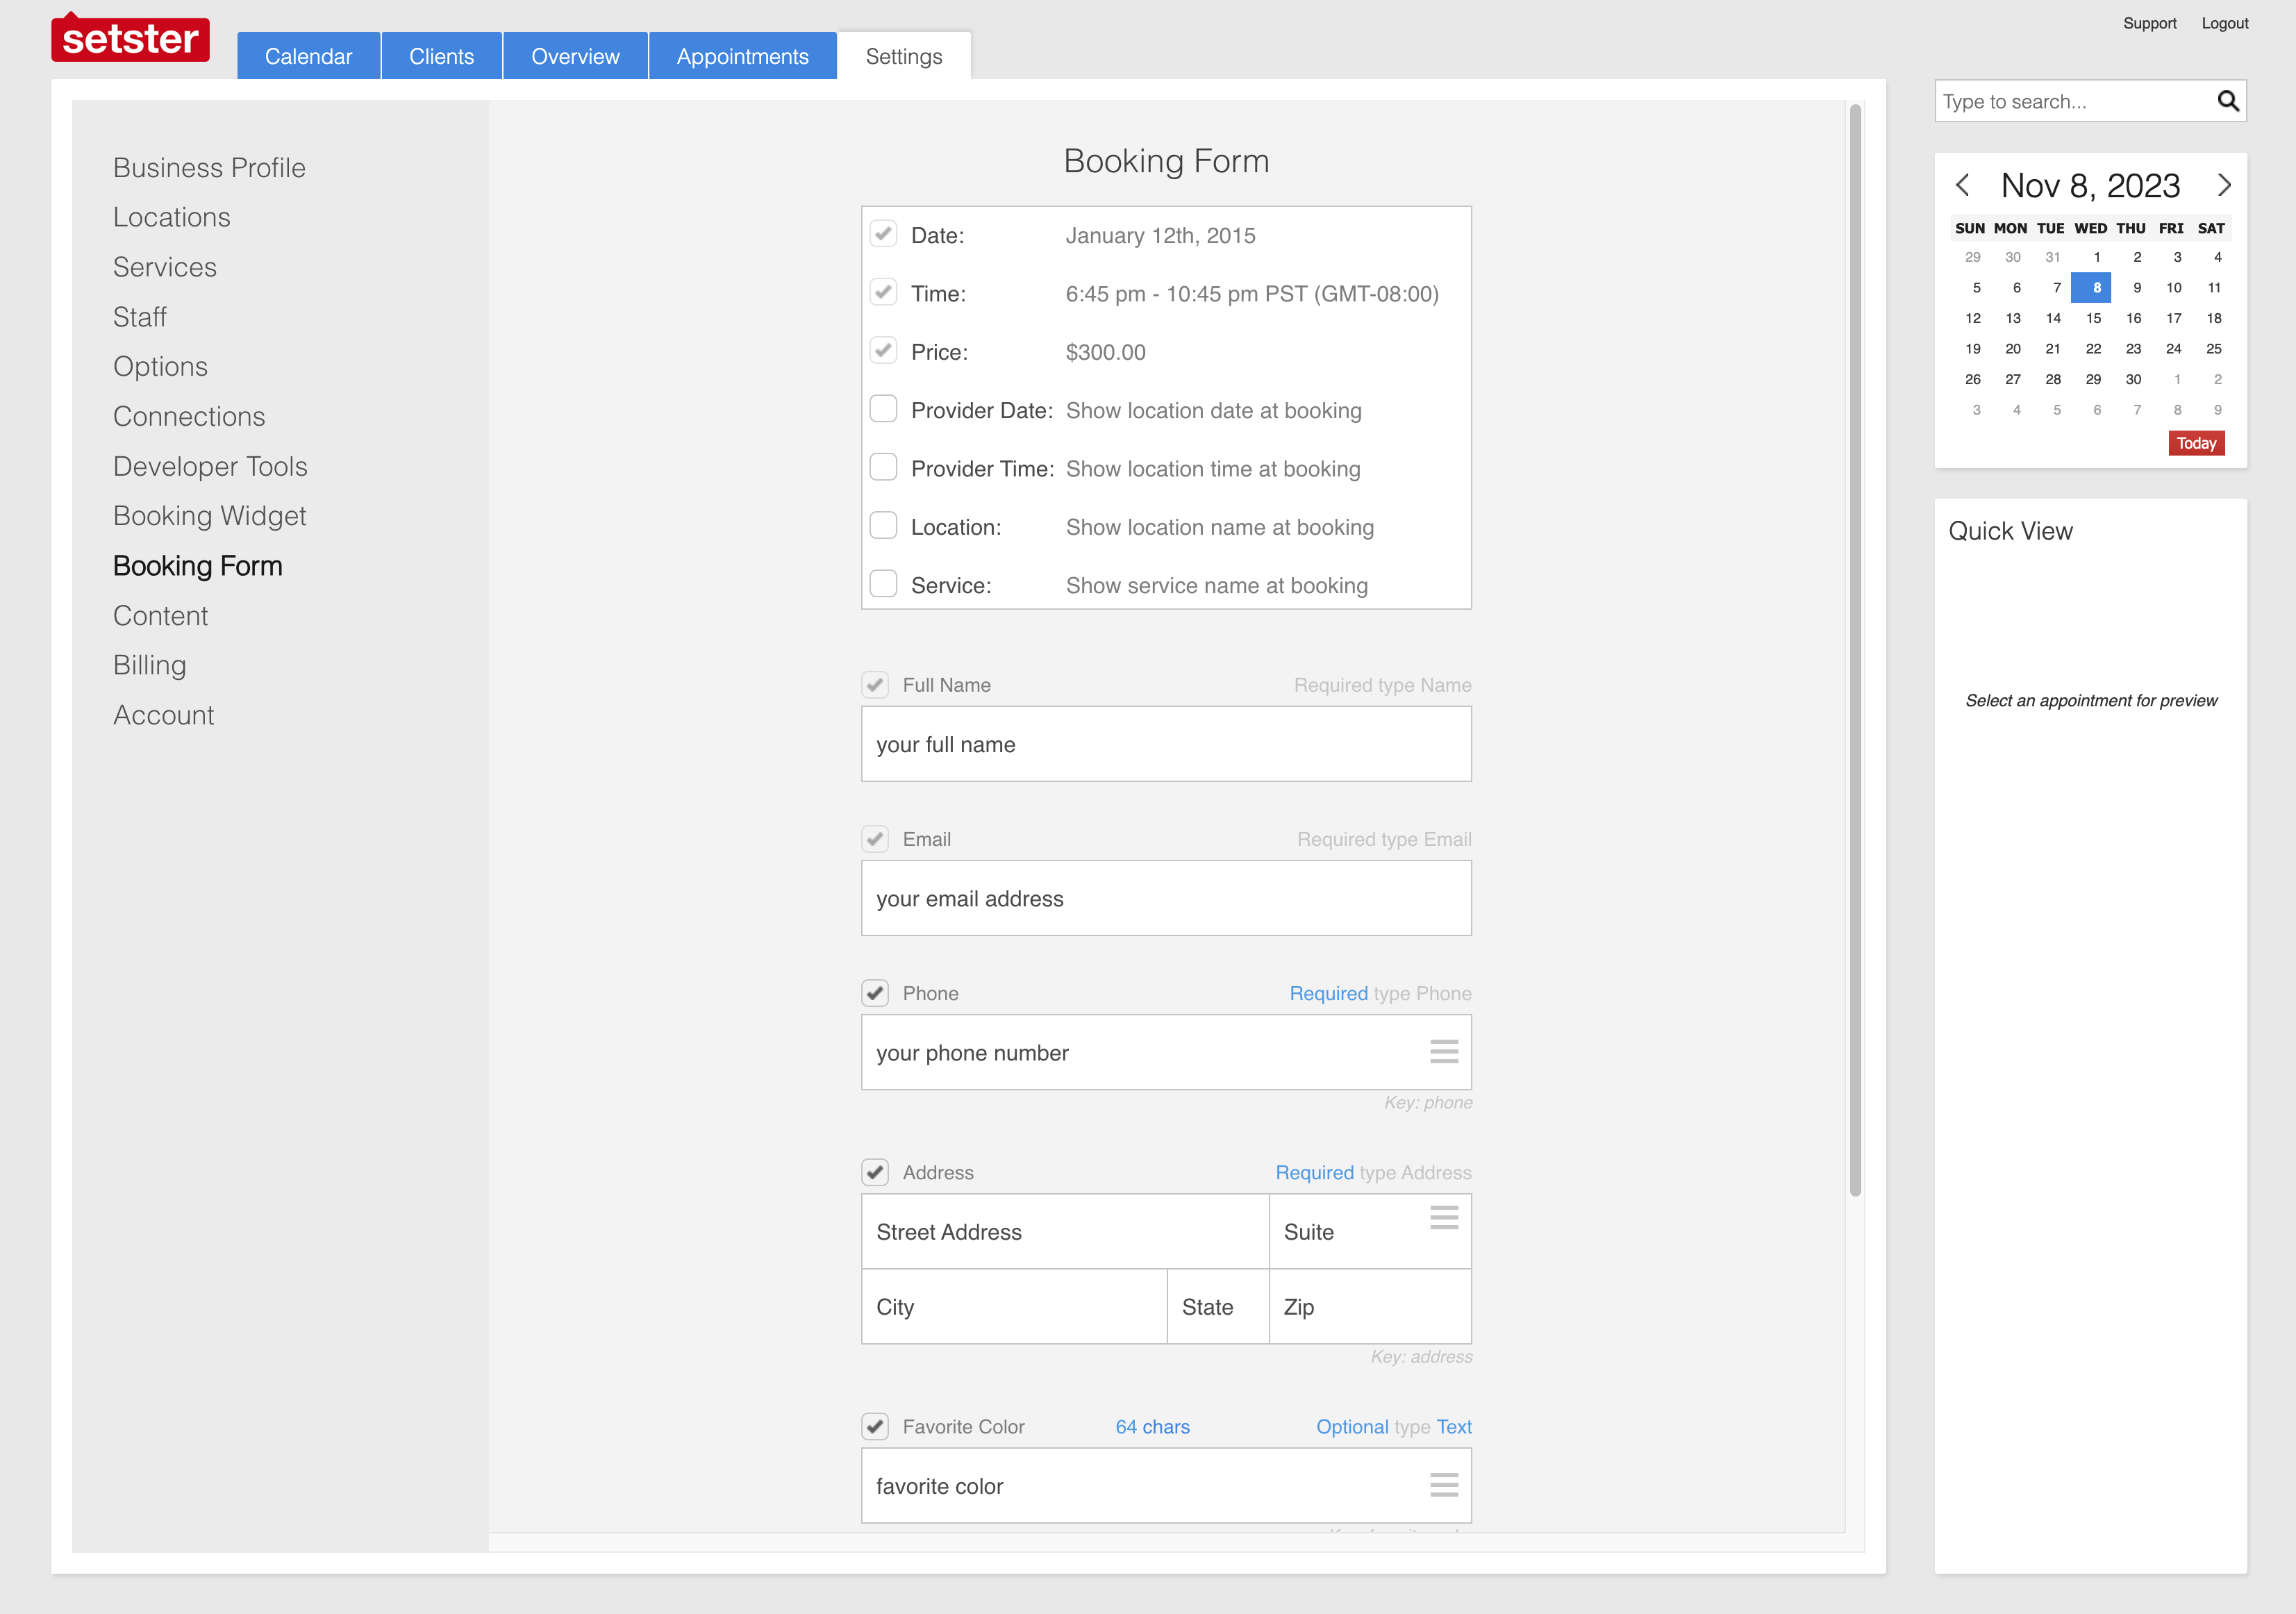
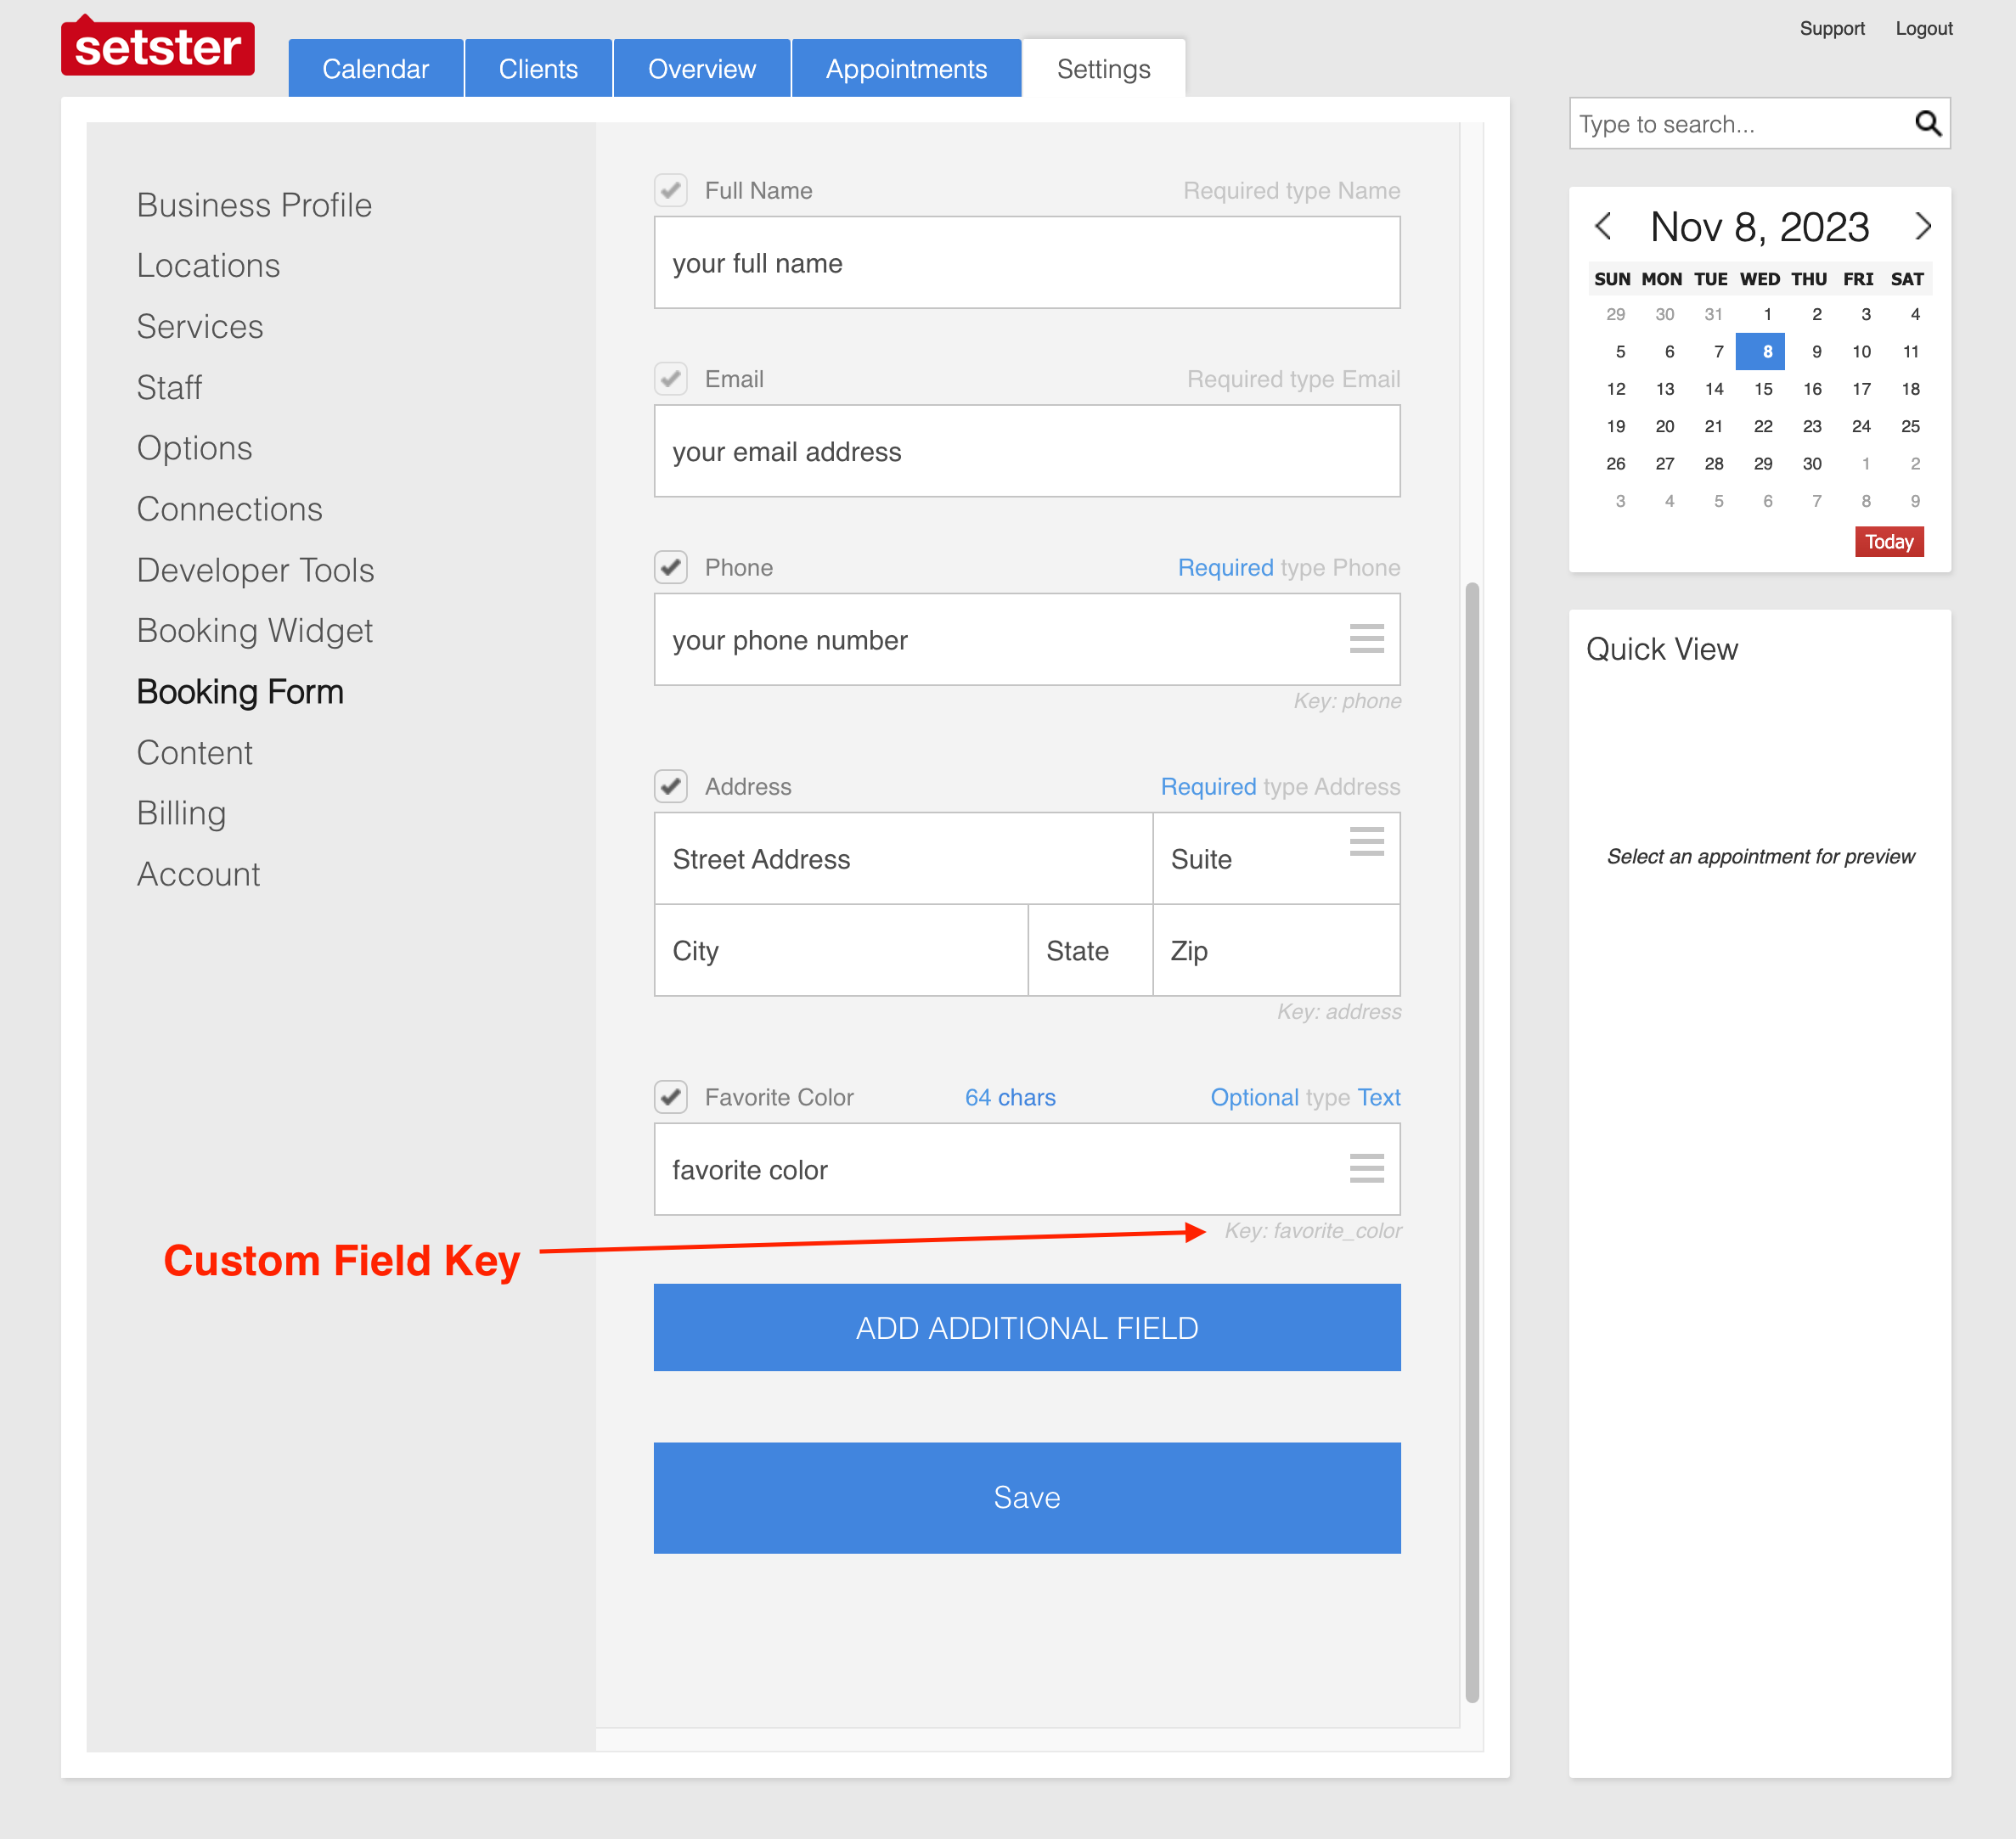
Step 1: Locate Booking Form Dashboard
Adding a new custom field happens in the Booking Form section in the Setster Dashboard.
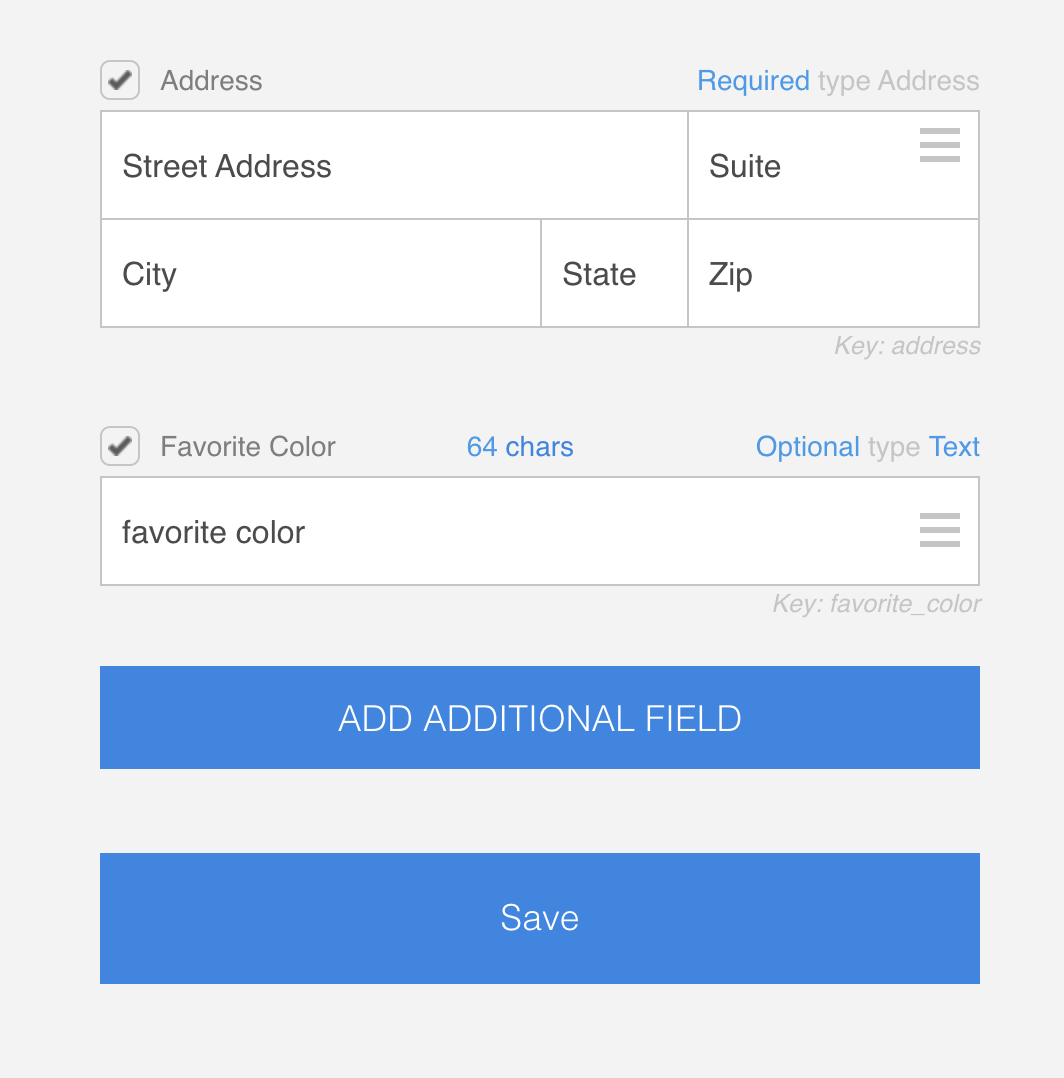
Step 2: Locate New Field Button
Click the ADD ADDITIONAL FIELD button at the bottom of the booking form to create
a new field.
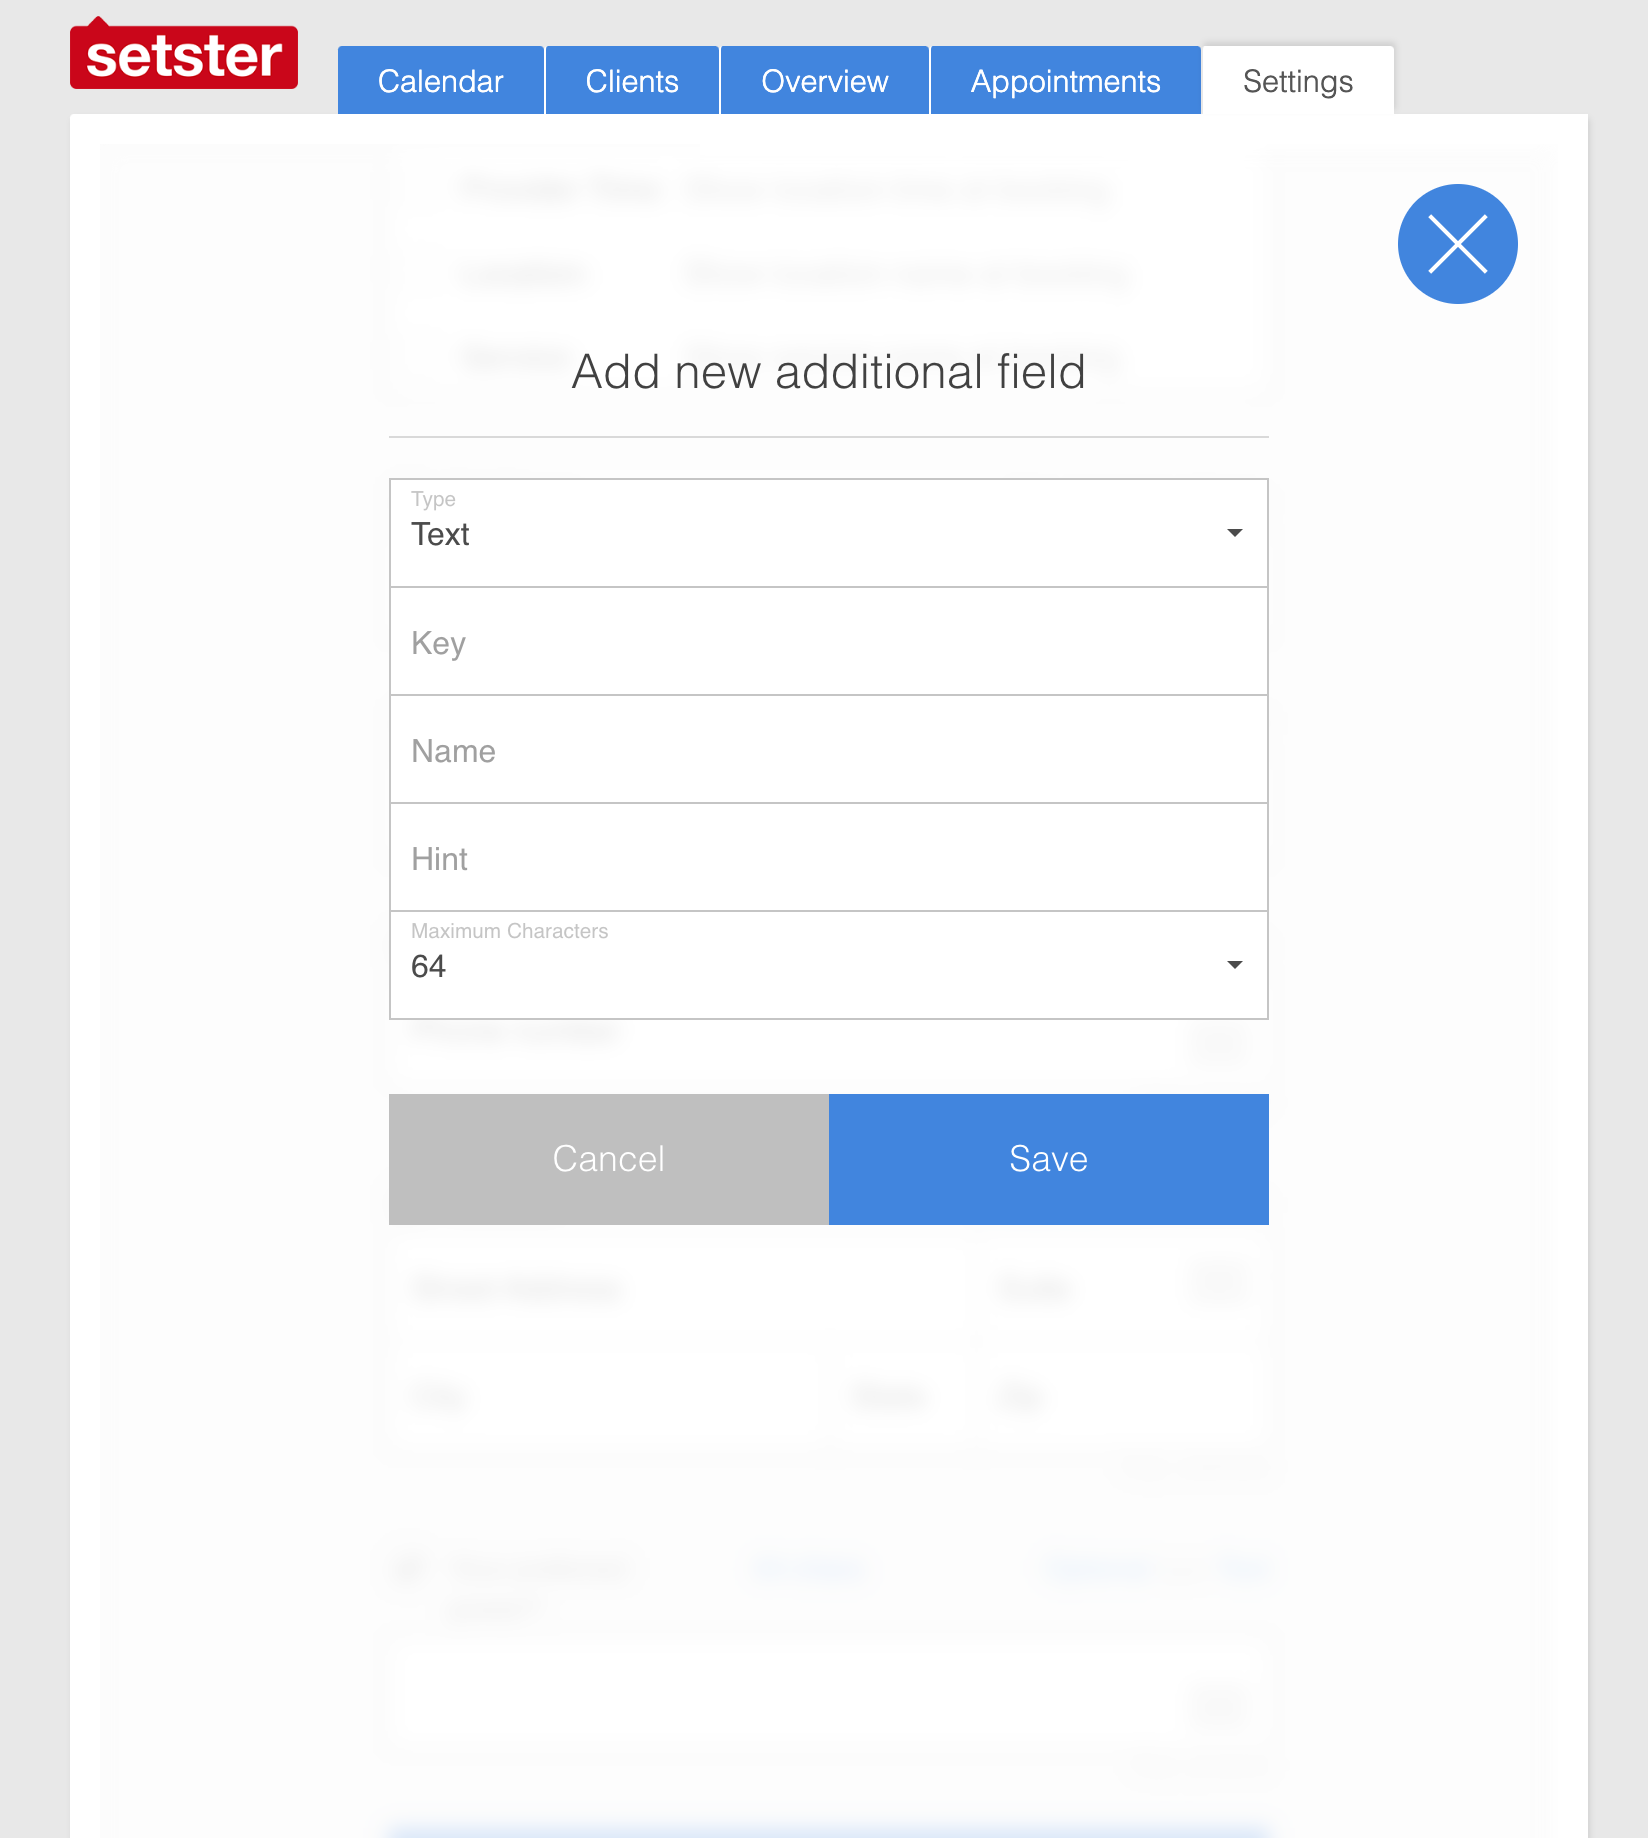
Step 3a: Create Custom Field
Here you'll input the details for your new form field.
The Key field should be a unique value as it is used as the identifing id for the new field.
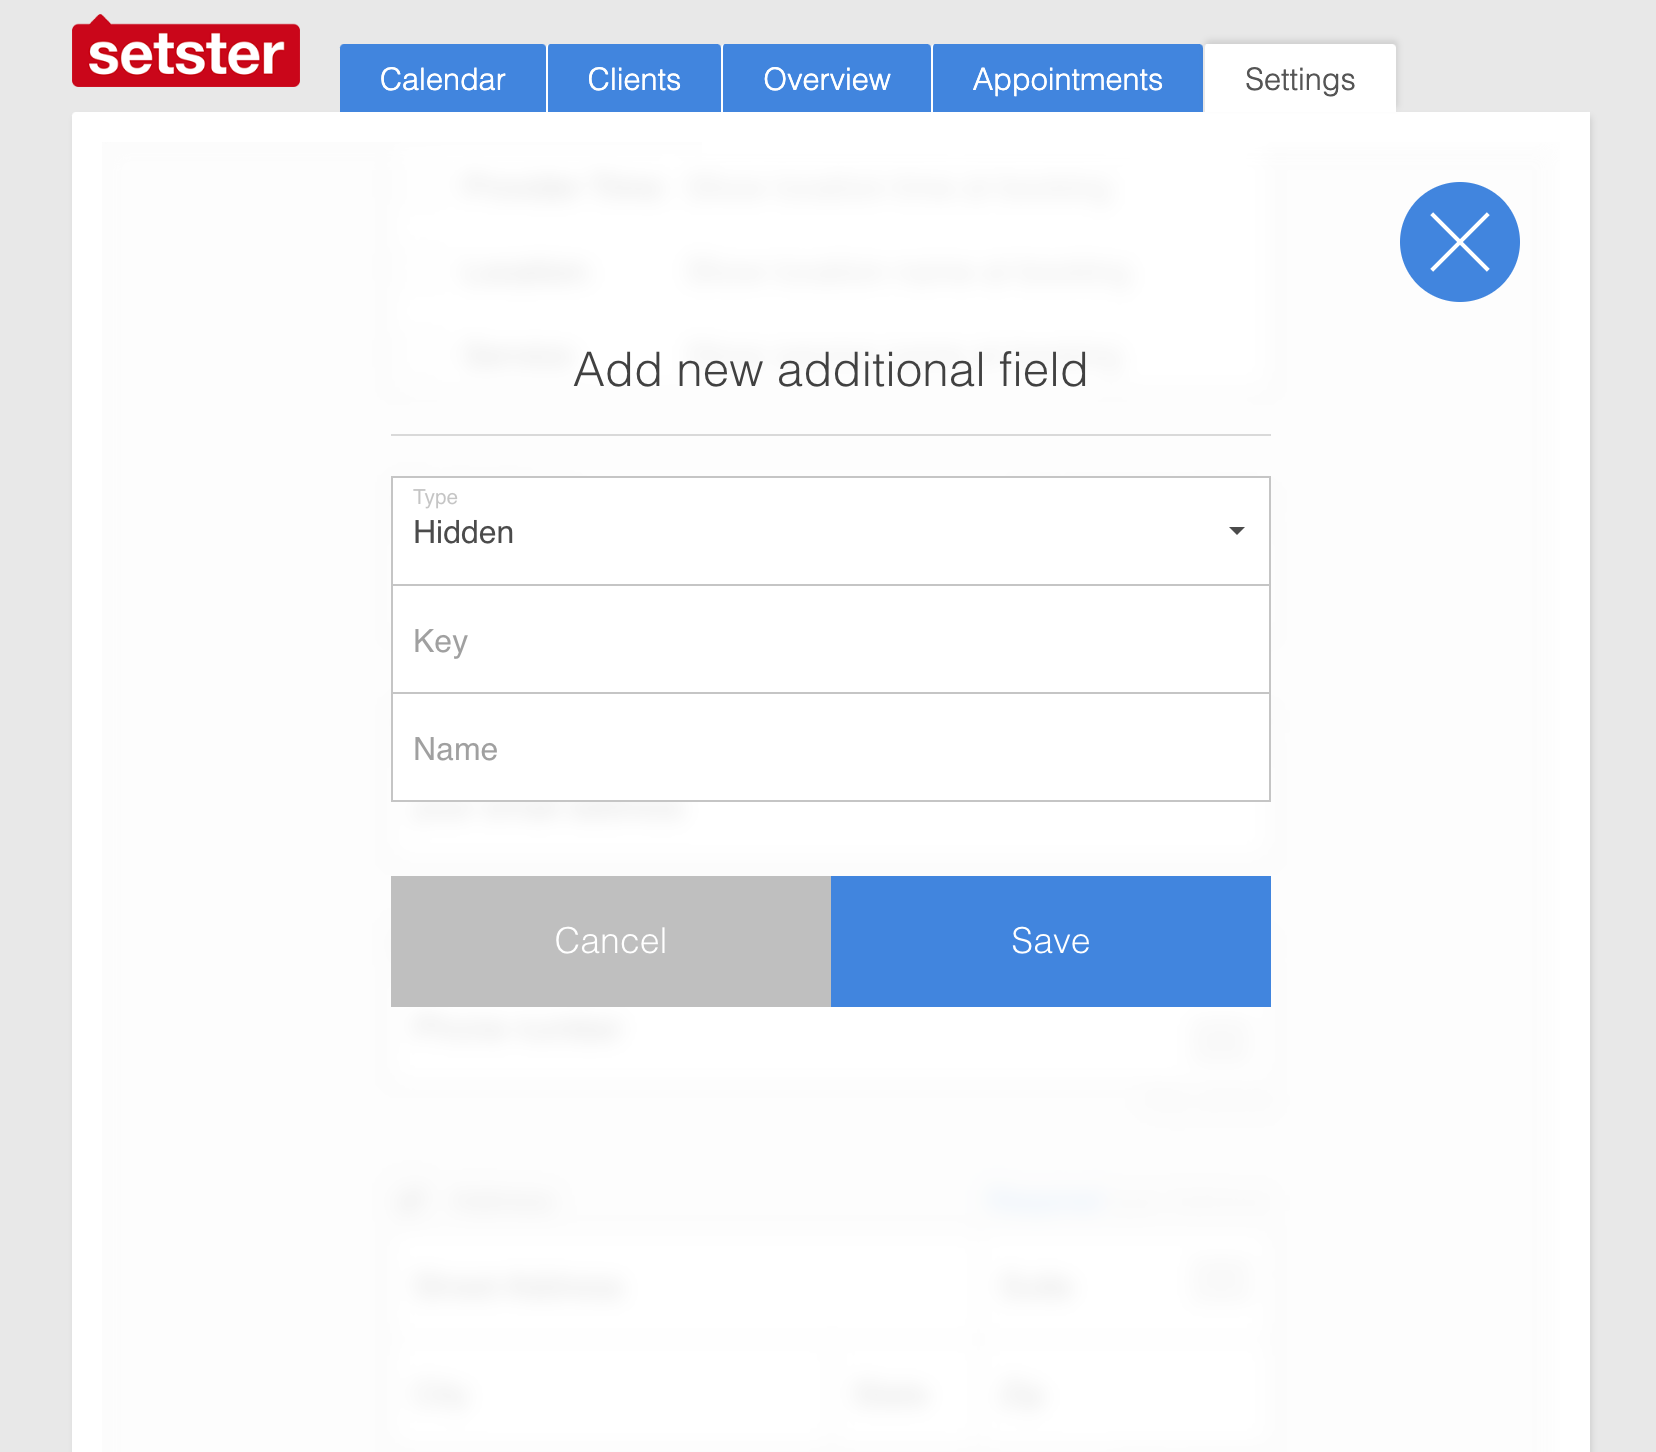
Step 3b: Create a Hidden Field
Here, you'll input the details for your new form field. Select the hidden type for fields that you append supplementary data to but don't want to show up on your booking form.
The Key field should be a unique value as it is used as the identifying ID for the new field.
After you've created a field you can find the field's key here:
Prefill Custom Fields
To prefill custom fields, we'll make some slight modifications to the SetsterStudio.init() script, which initializes the app.
For a rescheduling flow, this method of prefilling custom data is disabled since the data will be prepopulated from the previously booked appointment info.
The SetsterStudio.init() function, which initializes the embed, accepts three arguments: embed_id, settings_json, and custom_field_defaults. To prefill field values, we'll pass them as an object to this function during initialization.
Prefill Custom Text Field
As an example, let's construct the object for the custom field we created in the dashboard, which has a key value of favorite_color as defined in the dashboard.
Create an object we'll call myCustomData that we'll pass to the SetsterStudio.init() function's third argument.
const myCustomData = {
  favorite_color: "teal",
};

SetsterStudio.init("embed-1", settings, myCustomData);
Lastly, we'll put it all together into our original initialization <script>
<html lang="en">
  <head>
    ...
  </head>
  <body>
    <div id="embed-1"></div>
    <script>
      window.onload = (event) => {
        fetch("./settings.json")
          .then((response) => response.json())
          .then((settings) => {
            window.embedSettings = settings;
            var script = document.createElement("script");
            script.onload = function () {
              const myCustomData = {
                favorite_color: "teal",
              };
              SetsterStudio.init("embed-1", settings, myCustomData);
            };
            script.src =
              "https://cdn.jsdelivr.net/npm/@setster/setster-studio-core@1.1.0-alpha/build/app.bundle.js";
            document.head.appendChild(script);
          })
          .catch((err) => {
            console.log(err);
          });
      };
    </script>
  </body>
</html>
Prefetch Then Prefill Hidden Field
Now, let's look at adding a hidden field we'll call support_id with the same key name in the dashboard's custom hidden field and prefill it in the background. In this example, we'll fetch supplemental data before app initialization from an external source, like a ticketing solution, to set the value before we call Setster.Studio.init().
Create an object we'll call myCustomData that we'll pass to the SetsterStudio.init() function's third argument. In that object, set the value of the property that you fetched from an external source, like the support_id_value in the example below.
External Data Source
fetch(SOME_EXTERNAL_DATA_SOURCE)
  .then((response) => response.json())
  .then((data) => {
    const support_id_value = data.ticket_id;
    const myCustomData = {
      support_id: support_id_value,
    };
    SetsterStudio.init("embed-1", settings, myCustomData);
  });
Local Storage Data Source
It's generally not recommended to store personally identifying information in local storage.
const trackingId = JSON.parse(localStorage.STORAGE_KEY).tracking_id; // Change the key to your local storage key
const myCustomData = {
  tracking_id: trackingId,
};
Adding to Init Script
Lastly, we'll put it all together into our original initialization <script>
<html lang="en">
  <head>
    ...
  </head>
  <body>
    <div id="embed-1"></div>
    <script>
      window.onload = (event) => {
        fetch("./settings.json")
          .then((response) => response.json())
          .then((settings) => {
            window.embedSettings = settings;
            var script = document.createElement("script");
            script.onload = function () {
              // Get data from local storage
              const trackingId = JSON.parse(
                localStorage.STORAGE_KEY
              ).tracking_id; // Local storage

              // Get data from external source
              fetch(SOME_EXTERNAL_DATA_SOURCE)
                .then((response) => response.json())
                .then((data) => {
                  const support_id_value = data.ticket_id;
                  const myCustomData = {
                    favorite_color: "teal",
                    support_id: support_id_value,
                    tracking_id: trackingId,
                  };

                  SetsterStudio.init("embed-1", settings, myCustomData);
                });
            };
            script.src =
              "https://cdn.jsdelivr.net/npm/@setster/setster-studio-core@1.1.0-alpha/build/app.bundle.js";
            document.head.appendChild(script);
          })
          .catch((err) => {
            console.log(err);
          });
      };
    </script>
  </body>
</html>
Prefill Client Data
We can also prefill client data if you already know it during initialization. The following client properties can be prefilled in a number of ways, including fetching data from an external source (as described above) or from query parameters if they happen to have landed on the booking form from something like an email referral.
Prefilling client data can decrease barriers to booking appointments if you've already collected that information in some capacity.
Custom fields are tied to the appointment being booked or the Setster API Appointment Model rather than the Setster API Client Model.
"example@example.com"
"example@example.com"
"Jane Smith"
"+15555555555"
{
  "street": "Some street 1",
  "suite": "481",
  "city": "Los Angeles",
  "state": "California",
  "zip": "90210"
}
Fetch Data
fetch(SOME_EXTERNAL_DATA_SOURCE)
  .then((response) => response.json())
  .then((data) => {
    const clientPhone = data.phone;
    const myCustomData = {
      client_phone: clientPhone,
    };
    SetsterStudio.init("embed-1", settings, myCustomData);
  });
Query Params Data
const urlSearchParams = new URLSearchParams(window.location.search);
const params = Object.fromEntries(urlSearchParams.entries());
const clientEmail = params.email;
const myCustomData = {
  client_email: clientEmail,
};
SetsterStudio.init("embed-1", settings, myCustomData);
Adding to Init Script
Lastly, we'll put it all together into our original initialization <script>
<html lang="en">
  <head>
    ...
  </head>
  <body>
    <div id="embed-1"></div>
    <script>
      window.onload = (event) => {
        fetch("./settings.json")
          .then((response) => response.json())
          .then((settings) => {
            window.embedSettings = settings;
            var script = document.createElement("script");
            script.onload = function () {
              // Get query search param data
              const urlSearchParams = new URLSearchParams(
                window.location.search
              );
              const params = Object.fromEntries(urlSearchParams.entries());
              const clientEmail = params.email;

              // Get external data
              fetch(SOME_EXTERNAL_DATA_SOURCE)
                .then((response) => response.json())
                .then((data) => {
                  const clientPhone = data.phone;
                  const myCustomData = {
                    client_phone: clientPhone,
                    client_email: clientEmail,
                  };
                  SetsterStudio.init("embed-1", settings, myCustomData);
                });
            };
            script.src =
              "https://cdn.jsdelivr.net/npm/@setster/setster-studio-core@1.1.0-alpha/build/app.bundle.js";
            document.head.appendChild(script);
          })
          .catch((err) => {
            console.log(err);
          });
      };
    </script>
  </body>
</html>